Framed Friday: Bacon Cashew Caramel Popcorn.

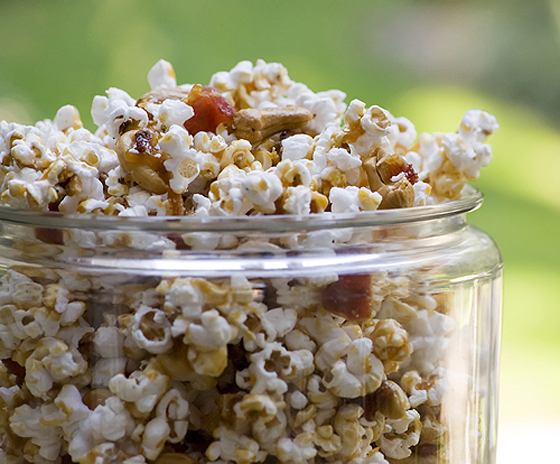
Now you have to admit, I have been very well-behaved in terms of the bacon recipes lately. I didn’t put any bacon in the pumpkin granola, or the marshmallow frosted cupcakes, or even in the spaghetti tacos. I am practically going through bacon withdrawal over here. And the only antidote might be this CRAZILY good popcorn. Bacon, cashews and popcorn, all held together with just a little bit of caramel and with a little red pepper tossed in just to keep you on your toes. It’s hard to describe how completely, totally, addictively good this is. All I will say is, one minute that jar was full up with popcorn, and the next it was empty. It’s all kind of a blur to me. A happy, sweet, salty blur.

This recipe comes via the wonderful Saveur magazine (who called out my little blog as one of their “Sites We Love,” so I in turn will love them forever), and they got it from someplace in Denver called Colt and Gray. I had never heard of Colt and Gray before this recipe, but based on this popcorn recipe alone, I love them too. It’s part of their bar menu (don’t you just love bar menus???) and I could easily eat it for dinner all by itself.

Here’s the deal. Pop up about 15 cups of popcorn (which is about 1/2 cup of unpopped popcorn kernels, which doesn’t make sense to me but it’s true.)  This will mean your popcorn ends up with just a tiny bit of caramel on each kernel, which was perfect from my point of view, but if you like more caramel on your caramel corn, cut the popped popcorn down to 10 or 12 cups. Cook up some bacon, crumble it up and toss it in with the popcorn. Add in some cashews, some coarse salt and some red pepper.

Now comes the fun part: making the caramel. You bring some cream to a boil with a tea bag, and let it sit for a while. (Tea bag? I don’t know, and I wasn’t going to ask any questions.) Then you boil up some sugar, water and corn syrup in a large saucepan until the sugar melts and turns amber-colored. Now comes the dramatic part: pour in the cream… it will bubble up and then before your eyes you will have a pan full of beautiful molten caramel. Quickly pour it over your popcorn mixture, quickly stir it up to coat everything with just a touch of caramel loveliness. Now turn the whole shebang onto a parchment lined cookie sheet and let it cool until the caramel hardens. Then comes the hardest part of all: trying not to eat it all in one fell swoop. Good luck with that part!

Bacon Cashew Caramel Popcorn

adapted from Saveur

• 1/2 cup popcorn kernels, popped to make 12-15 cups popcorn
• 6 ounces bacon, cooked and chopped
• 1/2 cup cashews
• 1 teaspoon kosher salt
• 1/4 teaspoon cayenne pepper
• 1/4 cup heavy cream
• 1 tea bag (regular black tea)
• cooking spray
• 1 1/4 cups sugar
• 1/4 cup water
• 2 tablespoons light corn syrup

1. Combine popcorn, bacon and cashews in a large bowl. Sprinkle with salt and cayenne and toss to coat.
2. Bring cream and tea bag just to the boil and remove from heat. Let sit for 15 minutes, press on tea bag and remove.
3. Line baking sheet with foil and coat with nonstick spray. Spray two large spoons with cooking spray as well.
4. Stir sugar, water and corn syrup in large saucepan over medium low heat until sugar dissolves. Increase heat to high and boil without stirring until  syrup turns amber, occasionally swirling pan. This will take about 15 minutes. Remove from heat and immediately add cream – mixture will bubble up – don’t panic!
5. Immediately pour mixture over popcorn, being Very Careful – it’s hot. Toss with the sprayed spoons until well-combined  and transfer to baking sheet. Cool completely and then break up into chunks.

~ Kate, Framed

2

Framed Friday: Chicken Vegetable Cobbler.

There is something about the word “cobbler” that just makes me feel all warm and cozy and contented. Most of my cobbler recipes are for desserts – apple, peach, and so on. (And just so you know, I have a chocolate cobbler recipe waiting in my stack of  “to be made one day soon” recipes. SOON. Very soon.)

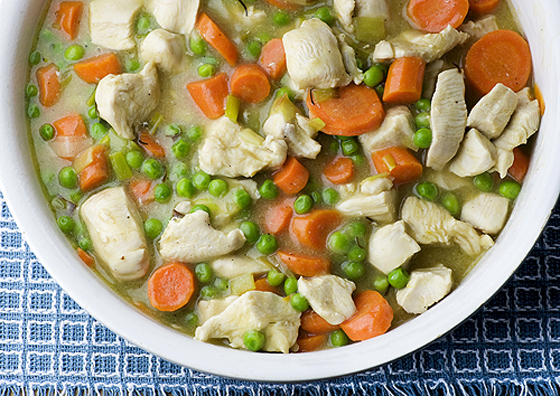
Anyway, cobbler is something I usually associate with dessert, so when I came across this chicken recipe in Mark Bittman’s fabulous video series, I thought I had died and gone to heaven. Cobbler for dinner! NOW we’re talking. First you cook up a heavenly, homey mixture of chicken, carrots and peas all in a creamy herby thick broth.

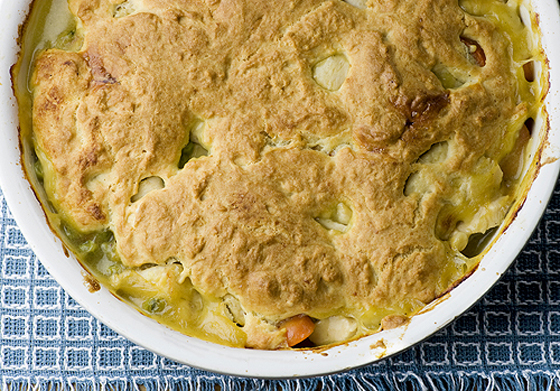
Then you top the whole thing with a buttery biscuit dough and pop it in the oven. By the time it is almost ready to come out, people and dogs will be drifting into your kitchen with happy and expectant looks on their faces. And really, isn’t that one of the main reasons we make things like chicken cobbler in the first place? Yes it is.

Chicken Vegetable Cobbler

adapted from The Minimalist
3 tablespoons olive oil
1 leek, washed and chopped
salt and pepper
1 1/2 cups chicken stock
2 sprigs fresh rosemary
2 medium carrots, cut in chunks
2 chicken breasts, cut into bite sized pieces
1 cup frozen peas
2 tablespoons cornstarch
1 cup flour
3/4 teaspoon baking powder
1/8 teaspoon baking soda
1/4 teaspoon salt
3 tablespoons butter, cut into small pieces
1/2 cup buttermilk
1 egg

1. Heat over to 400.  Put oil in large skillet over medium heat. When hot, add leek, sprinkle with salt and pepper and cook, stirring occasionally until soft, about 5 minutes.
2. Add stock and rosemary and bring to a boil. Add carrots and chicken and simmer until chicken is cooked through, about 10 minutes. Add peas and stir for one more minute. Remove rosemary and discard.
3. Whisk cornstarch with a few tablespoons of cool water to make a slurry and add to skillet. Sir until liquid thickens, and then transfer the chicken mixture to an ovenproof casserole.
4. Put flour in food processor with baking powder, baking soda and salt. Add butter and process until combined, about 30 seconds. Transfer to bowl and mix in buttermil and egg until it comes together into a sticky dough.
5. Drop spoonfuls of batter onto chicken mixture and smooth with a knife, covering as much of the surface as you can. Leave a few holes for the steam to escape. Bake for 35-45 minutes until golden brown. Scoop onto plates or bowls and serve at once.

~ Kate, Framed

2

Framed Friday: The Easiest Cupcake Frosting.

So, this is another one that has me scratching my head and saying to myself, so why am I only figuring this out NOW? Because it is so simple, and so delish, and so adorable looking. This one is SO easy there is not really an official recipe involved – just a quick run-down of the process. Here’s what you need:

Chocolate cupcakes
Marshmallows
An oven
A spoon

I made up a box of Duncan Hines chocolate cupcakes, because while I love a good homemade cupcake as much as the next person, sometimes you are just in the mood for cake that comes out of a cake mix box.  I am, anyway. And since I was going for the easiest frosting ever, it seemed to make sense not to knock myself out on the cake part, right?

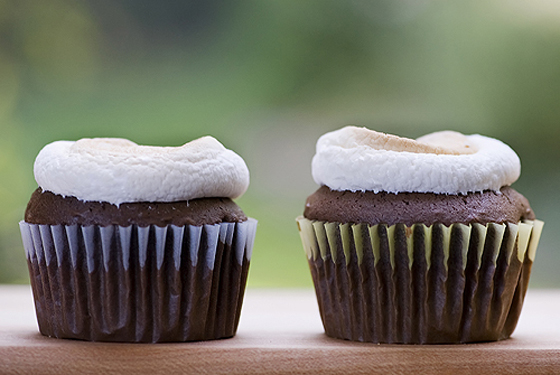
Anyway, here’s what you do. Bake up a batch of cupcakes however you want to bake ’em. While they are baking, grab a bag of marshmallows – the regular size ones – and count out as many marshmallows as you have cupcakes. When the cupcakes have 3 minutes to go, take them out of the oven but leave the oven on. Balance a marshmallow on top of each cupcake (this is the hardest part of the entire thing) and carefully slide them back in. Bake for another 3 to 5 minutes, just until the marshmallows are soft. They will probably still be pretty tall, but just take a clean spoon and press down gently with the back of it, and they will flatten right out.

By the way, if anyone thinks this looks like the S’Mores version of a cupcake, you won’t get any argument from me!

~ Kate, Framed

3

Framed Friday: No-Bake S’mores Brownies.

So, while I spend the majority of my time photographing cookies and spaghetti and bacon cinnamon rolls, I do venture out of the kitchen from time to time to take pictures of other delicious things. Like puppies. A little while back I was lucky enough to photograph this dynamic due of adorableness:

Can you STAND the cuteness???

Anyway, their owners are almost as sweet as they are, and on the day of our shoot they brought me a delicious box of Fat Witch Brownies. Which in case you haven’t had one, are the Most Delicious Brownies On Earth. And just for the record, the Fat Witch people have never heard of me, did not pay me either in brownies or anything else to say this, this is purely my own love and adoration speaking. This is why I was so excited to hear that the Fat Witch Bakery Cookbook had just been published, full of recipes for unbelievable brownies of every kind… I couldn’t get my hands on it fast enough. And now that I have a copy, let’s just say that there will be a steady stream of brownie making in my house, and I started out with the incredibly easy, amazingly scrumptious recipe for No-Bake S’mores Brownies.

That’s right… no bake. I had my doubts, but I promise you, it’s really true! You crush some graham crackers into tiny crumbs, and mix in some mini-marshmallows and chocolate chips. Then you melt some butter with some beaten egg, sugar and vanilla, stirring over low heat until it thickens just a bit. Cool it down a little, then pour it over your graham cracker mixture. Toss in a few more chips and marshmallows. Mixmixmix. Now spoon the whole thing into a pan that you have lined with foil and pop the whole thing in the fridge. (I love using a fridge in place of an oven!)  Thirty minutes later it will have set into a pan full of s’more brownie wonderfulness.

Fat Witch Cookbook!  I have my eye on the Molasses Brownies next…

No-Bake S’mores Brownies

from Fat Witch Brownies Cookbook

• 10 graham crackers, crushed (about 2 1/4 cups)
• 1 1/2 cups mini marshmallows
• 3/4 cups chocolate chips
• 1 stick butter
• 3/4 cup sugar
• 1 large egg, beaten
• 1 teaspoon vanilla extract
1. Line a 9 inch square pan with foil, leaving some hanging over the sides and grease the foil with butter.
2. Mix graham crumbs, 3/4 cup marshmallows and 1/2 cup chocolate chips together in a mixing bowl. Set aside.
3. Melt the butter in small pot and stir in sugar, egg and vanilla. Stir over medium low heat until slightly thickened. Cool slightly.
4. Add sugar mixture to graham mixture and stir well. Fold in remaining marshmallows and chips.
5. Press mixture into pan and refrigerate for 30 minutes. Remove from pan using foil overhang, cut and serve.

~ Kate, Framed

8

Framed Friday: Easy Spring Rolls.

I have to say that spring rolls were something that I never thought I would make, and I’m still not sure what possessed me. But one day I just woke up with a burning desire to make these, and I have to say that they were:

1. Delicious!!!
2. Super-easy to make.
3. Probably the best way to use up leftovers that I have ever run into.

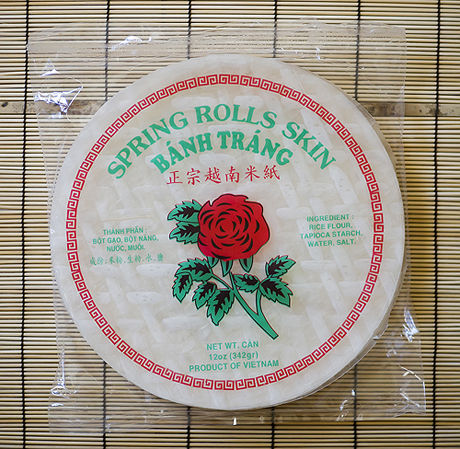
Honestly, the hardest part of the whole thing is finding these.

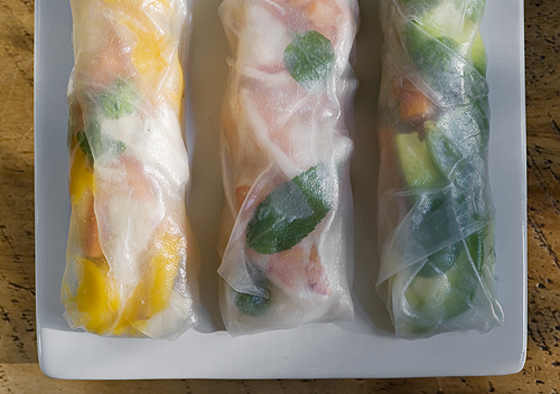
These are technically called rice noodle wrappers, and when I say they are hard to find I actually don’t mean hard at all – they were in the first market I walked into. And if worst comes to worst, I know you can absolutely find them on Amazon, which is my go-to source for pretty much anything that I have trouble finding out in the real world. Anyway, the key to making these is to have all your ingredients organized before you start out. Any combination of things that feels good to you is fair game, but just to get you started, here are the combinations I went with: shredded cooked chicken, fresh parsley, shredded carrot and chopped mango. Chopped cooked shrimp, mint leaves and shredded carrot. Sliced avocado, basil leaves, cucumber cut into tiny strips, and shredded carrot.

So!  Fill up a wide bowl with cold water,  take one of the rice wrappers, and dunk it in the water until it is pliable (this will take less than a minute). Take it out and lay it on your work surface and then cover the bottom third with your choice of filling, leaving about a one inch border on the edge. Fold that bottom edge over the filling and roll it over once. Tuck in the sides and finish rolling until you have a nice tight roll.  That’s it – you have made spring rolls!!

These are fabulous with whatever dipping sauce you like best – soy sauce, chili sauce, or make a wonderful peanut sauce by mixing up peanut butter, a little warm water and a little lime juice until you have the right consistency for dipping. Perfect for weekend snacking!!

~ Kate, Framed

4

Framed Friday: Cheese-Filled Tomato Salad.

I am holding onto the last warm days of the season with all my might… I am in Complete Denial that the last day of summer recently came and went. And one of the ways I keep my little delusion going is by continuing to buy those big juicy locally grown tomatoes at our friendly neighborhood farmer’s market. I figure as long as the nights are still frost-free and the tomatoes are still around, Summer Still Lives!!

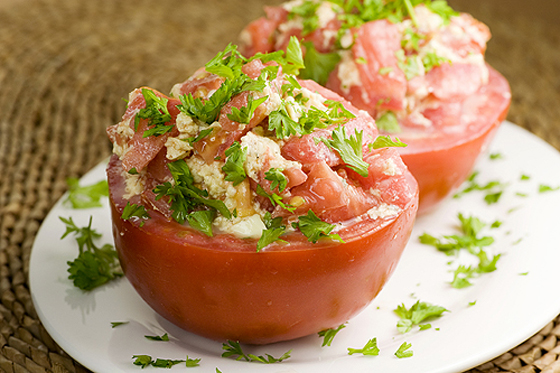
I came across this fabulous recipe while trolling through the Dining section of The New York Times, and was sucked in by the name of his original recipe: Robiola-Stuffed Tomatoes. Huh?  As it turns out, robiola is the name of a delicious cheese that I had never heard of or tasted before, and they actually had it at my local wonderful supermarket. It seems like it is a pretty close cousin to Brie and Camembert – soft and creamily scrumptious – and so if you can’t track it down either one of those would be a perfectly fine substitute. So here’s the deal: you cut the top off of a couple of perfect tomatoes, scoop out the insides, sprinkle them with salt and turn them over a paper towel to drain while you do the rest.

The rest is this: mash up some robiola or brie with some gorgonzola cheese and some butter. (No, this is not your typical dietetic tomato salad recipe.) Toss in some paprika and a little vodka. Go back to the tomato insides that you scooped out and chopped them up and mix them in too. Now, this is where the original recipe for the filling ends, and it was perfectly fine that way. HOWEVER…  you can take this an awesome step further by mixing in any of the following: Cooked orzo. Toasted homemade bread crumbs. Cooked white rice. Etc.  Because life is better with carbs. Now turn your tomato shells right side up, stuff them with the filling, and sprinkle the whole thing with chopped parsley and a little fresh ground pepper. You are now looking at the world’s best tomato salad… it makes a lovely weekend lunch, or a great, dramatic side dish for those last grilled chicken or steak dinners of the early fall season.

Cheese-Filled Tomato Salad

adapted from Recipes From an Italian Summer, by the editors of Phaidon Press
original New York Times article here

4 large ripe tomatoes
Kosher salt to taste
3½ ounces robiola, Brie or Camembert cheese, rind removed, diced
2 ounces gorgonzola cheese, crumbled
2 tablespoons unsalted butter, softened
Freshly ground black pepper to taste
½ teaspoon mild paprika
4 chives, finely diced
2 tablespoons vodka
1 cup orzo, rice or toasted bread crumbs, optional

1. Halve the tomatoes and scoop out the seeds and some of the flesh. Sprinkle the shells with kosher salt and turn them upside down on paper towels to drain for 30 minutes.

2. Place the cheeses and butter in a bowl, season sparingly with salt and aggressively with pepper, and beat until smooth.

3. Add the remaining ingredients and stir to combine.

4. Fill the tomatoes with the mixture. Place on serving dish until ready to serve. Serves 4.

Kate, Framed

1

Framed Friday: Tuna Tartare.

I know that when it comes to raw fish, the world divides into two distinct camps. There is the “I love it SO much I could eat it every day” camp. That is the one I live in. Then there is the “Get away from me with that raw fish” camp, and that is the one that my teenager lives in. And while it is possible every once in a blue moon to get someone to cross from the teenager’s camp to mine (I did it with my Southern husband but it was before we were married and for all I know it was one of his sneaky dating techniques), I’m not even gonna try. All you anti-sushi people out there? I love you anyway, and I will be back soon with something that is completely cooked.

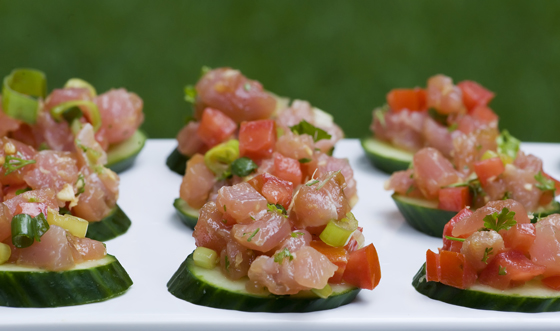
In the meantime, however, we must discuss the tuna tartare recipe from my current favorite cookbook, STONEWALL KITCHEN FAVORITES. This is an amazingly quick, easy and (if you are pro-raw fish) spectacularly delicious little number. You need to get sushi-grade tuna, which I promise is not hard… go to wherever you usually buy your fresh fish and ask. You chop it up in tiny little pieces and mix it up with chopped tomato, scallions, some ginger and sesame oil and rice vinegar, and then scoop it out onto sliced cucumber rounds.

It obviously makes a fabulous, dramatic appetizer for whatever fun weekend party you are planning, but the sushi-loving southern husband and I actually had it for dinner one Friday night recently and were deliriously happy. Raw-fishing-eating people that we are. Recipe below, and next post I will return you to your regularly scheduled cooked food.

Tuna Tartare,

adapted from Stonewall Kitchen Favorites

8 ounces sushi-grade tuna, cut into 1/2 inch cubes
2 sliced scallions, white and green parts
1 tablespoon chopped fresh cilantro leaves
1 tablespoon grated, peeled fresh ginger
1 tablespoon soy sauce
1 tablespoon Asian sesame oil
1 seedless cucumber, sliced diagonally into 1/4 inch thick rounds

1. Place the tuna, scallions, cilantro, ginger, soy sauce and sesame oil in a medium bowl and mix gently until well-blended.
2. Arrange the cucumber slices on a large serving tray and pile a generous tablespoon of the tuna mixture on each cucumber slice.  Serve immediately.

Kate, Framed

2

Framed Friday: Toasted Marshmallow Shake.

Today I’m really excited to welcome my first regular contributor to Design Crush, Kate of Framed. I first discovered her food blog about six months ago when I realized I was quite literally bookmarking every single one of her posts. (You might remember when I mentioned her Banana Bites. Yes, that Kate!) I’m 99% positive that if I were part of her household, I’d no longer fit through doorways. Yeah, that’s the kind of good I’m talking about here people. The photography is a whole ‘nother story, each shot looks like it was styled for a cookbook. And no I’m not just being kind by saying so.

So what’s Kate going to be doing here, you ask? Well, let me tell you. Each and every Friday she’ll be putting together a special weekend recipe just for you. Something to cap off the workweek, to celebrate another few days of freedom, or just kick back with in front of the television. Easy weekend cooking. Sound good to you? Me, too.

…………………………………………………………………………………………………………………………..

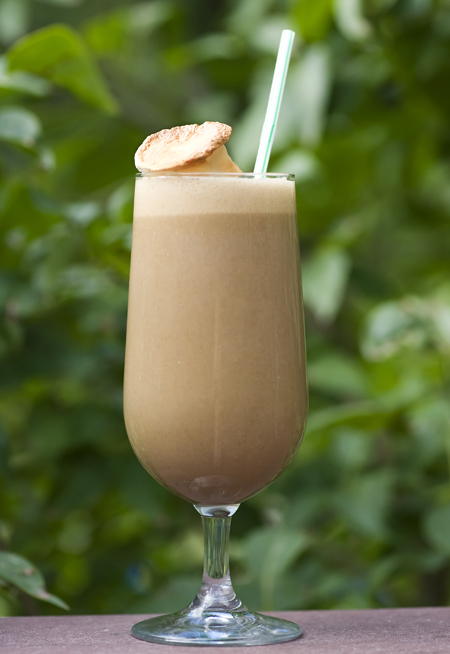
I have a crush to tell you about today, that glass of deliciousness up there. It is a Toasted Marshmallow Shake. Yes, you read that right. I know it looks like it might actually be a chocolate shake, but that delectable brown color comes from blender-ized toasted marshmallows, along with some milk and some vanilla ice cream. And when you take that first sip… it’s a total toasted marshmallow in smooth, silky milkshake form.

I helped one of my sweetest friends try this recipe out over Labor Day weekend, and speaking of sweet…this shake is almost as sweet as she is. It is sweeter than this:

It is even sweeter than THIS:

And that is pretty sweet. Here’s the deal – you spread out a bag of marshmallows onto a cookie sheet. Make sure you line the cookie sheet with foil, and if you have the nonstick kind, even better. Toast them under the broiler until they are well, well, well-done. Watch those babies closely, and stir them around a little – you want them toasted as all-over as possible. Then pop them in your blender with 2 cups of vanilla ice cream, 2 cups of milk and a tablespoon of sour cream. Blend for 5 minutes. Yes, five minutes. Then park it in the fridge for a while until it is good and cold and presto – toasted marshmallow shake. Make sure you hold back one marshmallow to toast lightly and perch on the top.

Toasted Marshmallow Shake, adapted from Spike Mendelsohn’s recipe

1 ten ounce package marshmallows
2 cups whole milk
2 cups vanilla ice cream
1 tablespoon sour cream

1. Preheat the broiler to high.  Line a cookie sheet with foil and lay marshmallows in a single layer. Broil until very dark brown, watching constantly and stirring halfway through. Cool.
2. Add milk, ice cream, sour cream and marshmallows to blender. Blend for 5 minutes. (You may have to do this in batches, depending on the size of your blender.
3. Chill in refrigerator until very cold, about one hour. Top with lightly toasted marshmallow and serve!

5